Choosing Hardware
Costs, Frames, Flight controllers and More!
- Choose your flight controller
- Select motors, LIPOs, ESCs and propellers
- Selecting a transmitter and receiver
Before starting this section, we suggest reading the Troubleshooting and General section.
Have a discussion about the costs of building your drone. It’s not cheap! We suggest setting up a budget before you start planning. But more importantly, ask yourself what goals you have for your project? If you’re on a budget, try to optimize only 2-3 aspects of your drone (i.e. autonomy, flight duration, range, FPV, speed, etc). Otherwise, your project’s costs and complexity may quickly get out of hand!
Choose your flight controller
This varies based on your chosen optimization. In our case, we wanted a hybrid that can perform all the requirements mentioned above, to maximize our learning experience. So, we used the Navio2 with a Raspberry Pi 4. Another common build is for racing where the primary focus is to select a lightweight FCU. Once you have selected a FCU, note down its weight and proceed to the next step.
Select motors, LIPOs, ESCs and propellers
These steps are interdependent, so they should be considered simultaneously.
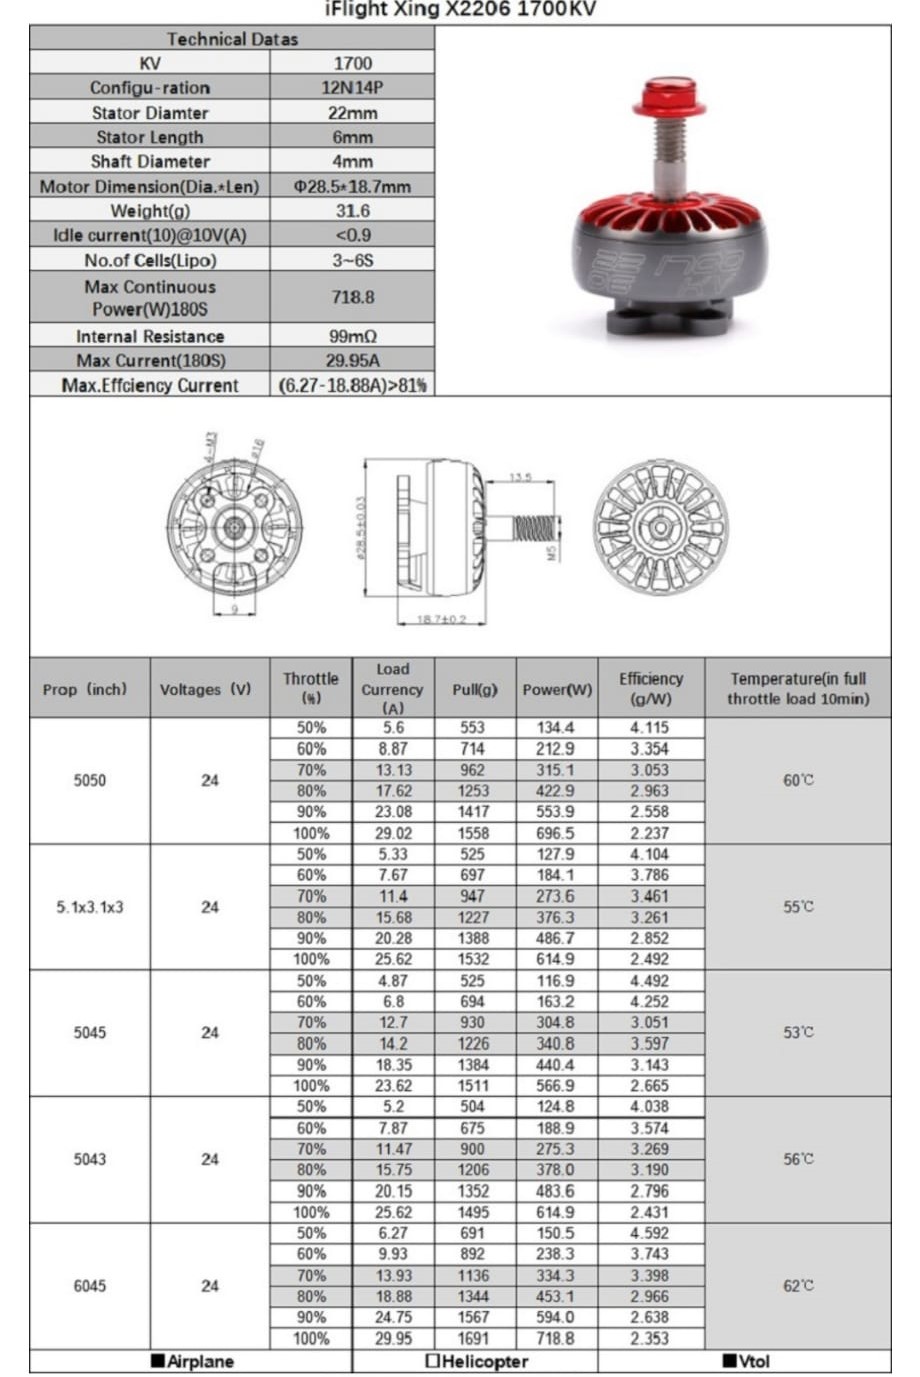
Every frame has size restrictions that determine which motors and propellers can be mounted (defined usually by a number like 2205). After you have the compatibile motors, you should look at the amount of lift your motors generate at various throttle levels from the motor specification sheet. It should look something like:

Then, look at the current being drawn when the motor is at maximum throttle with your specific propellor choice. This will give you the amperage for your ESCs.
If you are not using a Power Distribution module, please ensure your chosen ESCs have a Battery Eleminator Circuit capable of meeting your FCU’s power requirements.
Next, you should check what battery cell configuration can be used with the motors and ESCs you have chosen. Usually motors accept a range of battery cell configurations (e.g 4S-6S). Once you select the cell configuration that works with your ESCs and motors it’s time to select an appropriate
mAhvalue. Use this calculator and see the estimated time your drone will fly by changing themAhvalue. It’s also worth noting how the time changes as you vary the flying load (throttle).- Once you select the battery add the following weights in grams:
Frame + Motors + Battery + Flight Controller + ESCs + Power Distribution Module + 70We have decided to add 70 grams as a good measure for the receiver, GPS and wiring.
This weight estimate does not include any FPV equipment! If you wish to add FPV please select a transmission module and camera and add those weights too. They are usually an additional 30 grams.
- Once you get your total weight use this calculator to see if your drone can lift off! A ratio of
2:1is good to fly and program with. But! Having a higher ratio means you need less power to fly, which means you can use your motors at more efficient speeds.
If your drone has a lower ratio, just go back and find a compatible motor that gives you your required level of thrust.
An easy way to skip this step/ confirm your choices is to pay 1$ and use the following website to see if your drone hardware is compatible. It’s a small price to pay for a lot of peace of mind.
Selecting a transmitter and receiver
This may seem simple but when you start the process it can get really confusing (see our section on RC).
Ensure that your Receiver and Transmitter share at least ONE protocol to communicate with each other!
Continue with Assembly